preface :
this "how to draw a manga" tutorial is similar to Zarosoki tutorial but my way of drawing is a bit different (it's my way of graphic designer, i won't give up, it's a promise for the life :p) (i watch a bit much naruto..)need : - Adobe photoshop (i use CS2 but CS1 or older must be good cause we'll just use basic tools)
first step : some clean
we gonna use this pic for the tutorial (chapter 284 - 16)

first, we gonna redraw main line of the caracter (and some object of the pic if it's need). for that, we simply use "Line tool". I use a weight of 2px, but some times i use 1px for small detail

try to follow exactly the line and don't be afraid of making a lot of line
Important. After the first line, active the auto layer adding ("Add to shape area"), else you gonna had a lot of layer and it gonna be very difficult to edit it.
the pic with line edit should looks like that

and the complete pic with line remake should give a result like that

doesn't it look a bit better ?
now we could make some clean.
due to lines remake we could erase easily the background for some part, like that

you can clean the rest of the background with polygonal lasso

second step : cell shading
now we can begin the part interesting you : color the caracter
for each parts to color we gonna make a different layer.
to color caracter we need only 1 tool : polygonal lasso
first we select the part you wanna draw with the polygonal lasso (we gonna begin by the forehead)

now you can create a new layer with "multiply" blend mode to navigate easily, i associate one layer color by caracter and give the name of the part to the layer

you can now fill the select area by the choosen color (in the layer you just make), and always with the selection, delete the part in "Background" layer.
we obtain something like that

now, we gonna use a powerfull tool : lock the transparent pixel

this tool prevent to draw out of the selection of the layer (gonna be very usefull to make the shading)
One : choose the light source
The shading can be compare with the shadow, so you need a light source to make a shadow (the light source is virtual, it's not a physical option in photoshop ^^).

here we gonna choose this one.
what we have to see here is "what parts makes shadow". If you don't see what can make a shadow, imagine a simple try, like you. when sun shine, you make a shadow on ground, or if you put your hand between your head and the sun, a shadow will appear upon your face. Here it's the same way but we exagerate it a bit.
We could find 3 main parts by the source light.
- the end
- the middle
- the start
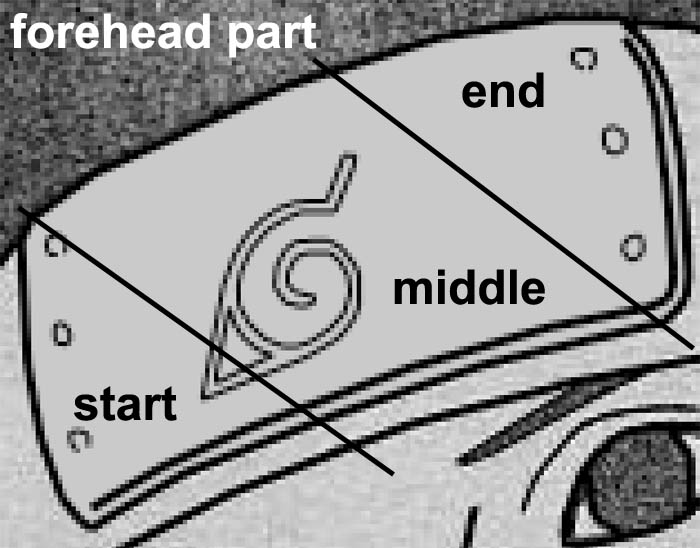
- the star will be cleary
- the middle will keep the same color
- the end will be the shadow
Two : Apply shade style
now we just have to apply this principle to our parts, and we obtain.
my method to fill :
make the selection you wanna fill. What is important is to make a good selection into the parts, but with the power of the "lock transparent pixel" you don't care of "what you select out of the part".
when your selection is make and the color is choose (in forecolor), use "Alt + del" to fill the selection. its the simple way 'cause photoshop gonna make itself a little shading of your chosen color and the color near it.
i agree, this isn't a very beautiful shadow, but it's the principle : 3 main parts.
by reflecting a little, we arrive at the result, the shadow must follow a bit more borders of the part.
So, we have to follow the border of the part AND make some smooth.
so, we remake a selection who should looks like that :

here you can see the way i select the part gonna be shadeand for the fill i use "Alt + del" to fill the selection.
we apply the same thing on the cleary part, and we obtain

After, you have to imagine a bit by yourself "what shadow, reflect could appear ?". Here we can suppose some light reflect on metal.
with the same method, you can obtain something like that :

here i fill the konoha's logo with a dark color.
Three : replicate it on other part
we can now apply the same method on the other simple parts.

here i draw the forehad protection in the same way : 3 parts, cleary part in foreground, normal color in the middle, shadow in the background of the part.
we can notice another thing on the forehead's shadow : the shadow of hair.
we suppose here hair was put on forehead, so it make a shadow who follow the hair with a shift (it's a choice, due to light direction).
for the hair, i use some different method to draw them. Here i show you one method this time, i'll show you more later.
This method use the same way of other parts, 3 step : cleary, normal, shadow (i know, here i hadn't shadow, just cleary & normal ^^).
You can reproduce yourself border of the hair OR, select the layer (by CTRL + clic on layer), it should select it.
now, you could reduce automatically this selection by :
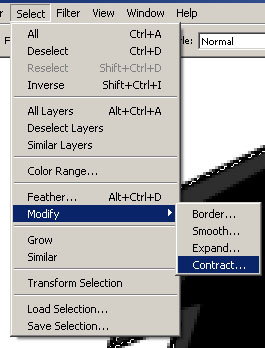
you can contract it by 3,4px or more, like you want. This new selection select the part who NOT GONNA CHANGE. You should edit a bit this new selection if some selected parts should be color.
When the selection is over, inverse the selection and just fill hair.
i personnaly prefer to make myself the selection cause you obtain a better result, but to begin or if you don't wanna lose some time to choose what you gonna color, this way isn't so bad.
Try to reply it on mask. I color it in cleary black, and the shadows gonna be black.
an other sample of selection to make shadow :

is obtain by a selection of those type :


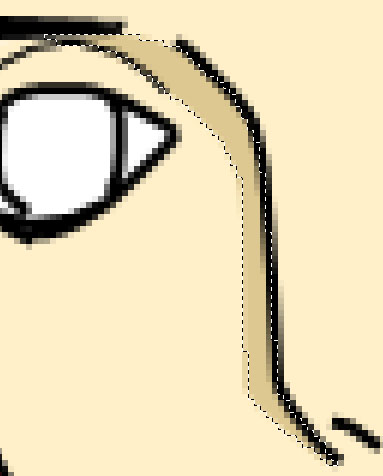
Here we can see 2 types of shadow :
- those make by the forehead protector
- a one make by the form of the face
the second are new type, and an important one. It's the type who gonna make "3D" effect on some surface.
this type is one of the harder to make the first time, 'cause you have to think about "how the face looks like in real, so what could make shadow on
cause detail are different, you could use different tone of the main color (generally between the shadow color and the cleary color).
now, we could clean face (it gonna be radical ^^)

We can now color the face (caution : if important detail are on face, you should keep it)

here some explanation must be given. Like i said before, for the face you have to imagine "what make effect".
some answer are avaible :
- nose (the first everybody think)
- cheeks
- surface under lips (i often shadow it)
- eyes
one of more importants part is nose. To shadow it we could make something like that :
by now you should saw how we make it, how we saw where the shadow is.
the cleary effect on other part of the nose is to make a "balance", cause this part is directly affected by the light, so cleary than normal color.
you could apply some tone of this color at different part of the face, like that

i don't really like put one here on this pic, but it was for the sample
four : the eyes
the eyes is a bit different to color, 'cause we've to make this little "sparkling".
they're different way to make it but i will explain the most used here (and the other later).
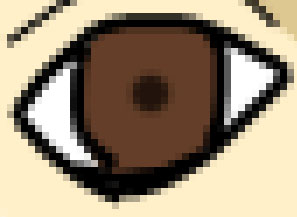
first, we simply choose a color for the eye, here brown.
we fill eye with the color and add if necessary a black point in center of the eye
after that, we have to add light effect (cleary and shadow), so here you can follow your feeling and imagine a lot of effect.
Here some i usually use.

And finally, we add the sparkling.
the technique is to draw some white to give lens flare effect. (You should remove a part of the drawed line)

And you obtain something like

five : finishing
Now, we just have to finish to color the rest. Just apply the same method, and it must be easy
you should obtain something like that at last

end
Now you should apply this to other draw and improve this technique to draw better then that ^^.soon i'll make some other tutorial like
- how draw clothes
- different technique to draw hair/eyes
- and i don't know what at this time ^^
